|
What’s in Process |
|
||||||||||||||||||||||||||||||||||||||||||||||||||
All models are available in varying fingerboard widths and scale lengths, the standard for the classics being 52 mm at the nut and 44 mm at the nut for the steel strings, with a 650 mm scale. We also offer a 660 mm for the larger hand and a 644, 640, 635, and 630 mm scales for the smaller and younger student’s hand and a variety of neck widths and thicknesses. All models are appropriately constructed for the scale and dimensionally thicknessed, the standard for a 650 scale being 22 mm including the fingerboard.
|
||||||||||||||||||||||||||||||||||||||||||||||
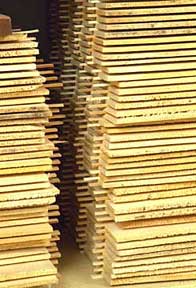
Stickered German spruce for tops, fresh into the country from a European buying trip. |
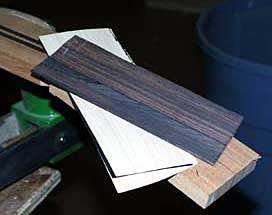
A spectacular back and sides set of Brazilian rosewood. This piece came from a knife and tool handle factory and was imported in the 1930s. |
There are three woods we commonly use for top construction: Sitka spruce, red cedar, and European silver spruce. Each wood has its own individual tonal characteristics, suggesting a general direction in which to work.
Sitka spruce and red cedar are grown in the Pacific Northwest and Alaska. Sitka is the wood most commonly used by commercial steel string manufacturers. Red cedar is mostly used on classical guitars, although I use it for some of my small bodied steel strings. European silver spruce has been the choice of many great guitar and violin makers throughout history. It has, in our opinion, the clearest and most brilliant bell-like quality and is the rarest and most expensive of the three woods.
Back wood is chosen for beauty and density, ring and reflectivity. The varieties best suited are Brazilian rosewood, Indian rosewood, maple, koa, and walnut. Each has its own particular sound, but for classics Brazilian, Indian and European maple are best, Brazilian being the most brilliant and costly.
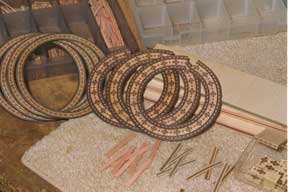
We design and make our own rosettes. These are made from slices of the veneer stacks shown in the back of the photo. The slices are glued together to form the mosaic tile effect. For a more complete look at rosette making, click here. |
Instruments are built in one of two methods. When instruments are
produced commercially, an inside or outside form holds the ribs
in place while blocks and linings are attached. The top and back
are then clamped to the outline. While this may facilitate the assembly
time, it can produce serious flaws by tensioning, especially the
top, during assembly. I use a slower, more traditional method for
building both classical and steel string guitars. That is to say,
I build from the top upward in an outside mold; the ribs just setting
onto a top that is built on a workboard containing the exact shape
I want in the finished top. My molds are so precisely formed that
they index onto the workboard via a pin system. The complex shape
of the top is exactly reproduced on the rim of the mold so as to
be a chalk fit. The linings (or tenuonies) are then set to the  ribs
and formed to the shape of mold including any angles required to
fit the curves or doming of the top. This forms a tensionless bond
that glues up by only the weight of the mold and ribs on the workboard
pins. This is especially useful when a complex top shape, rather
than a flat top, is used.
ribs
and formed to the shape of mold including any angles required to
fit the curves or doming of the top. This forms a tensionless bond
that glues up by only the weight of the mold and ribs on the workboard
pins. This is especially useful when a complex top shape, rather
than a flat top, is used.
The commercial production line flat-top guitar is less consistent in power and more susceptible to cracking and fatigue due to changes in humidity. A top that is built with a curvature, such as I build, is vastly stronger and has the ability to flex up and down off its central axis for changes in humidity. I start by joining the wood with a spring joint and then following the natural cup produced as the inside of our top.
A side view of the treble side fans being glued to the top in the vacuum press.
A straight-on view of the same two treble side fans. Note the shortness of the treble side fans for high frequency. |
Once we determine the inside and outside of the top, the rosette is installed into the outside, the convex side of the spring joint, we then surface the interior and a reinforcing plate is glued under the rosette. When that has dried the sound hole is cut, the edges rounded, it is now ready for bracing.
A top is placed on a work board having a very complex shape. Curved braces with the shape of their area of the top milled onto them are fit to the top to produce the desired archings. Then fans are spring loaded (thin braces pushed into shape to produce a little tension) to the tone areas under the bridge.
Here I need to discuss my innovation for glueing braces and other
critical elements. I used to use the method of most luthiers and
glue braces using clamps or, the oldest form of clamping, a Go bar
system. This is a bench with both a table surface and a top layer
attached with posts that a thin stick can be bent between and apply
pressure to a brace. This system, while faster than clamps still
has the same disadvantages: hot and cold pressure points that crush
the wood and form waves in the brace/top joint. After quite a few
years of this, I built a system of vacuum tables that press the
wood into shape with an even 1800 pounds per square foot—the
miracle of weight from a column of air. This produces a clean, ripple-free
glue joint, and I have heard a great increase in volume and controlability
of voicing since I made this change. It also allows me to vary brace
patterns with great ease and to allows me to clamp ever increasing
complexity into the patterns I work with. The top is then voiced,
i.e., the braces are carved so as to produce a particular scale
when the exterior of the top is tapped.
A close-up shot of the two treble fans jointed over the bridge plate. Precision fits to the finished and rounded bridge plate adds stiffness and continuity to the design. |
Here we have the top completely braced with over-dimensioned fans awaiting the voicing process. |
A side view of the oversized fans. The fan in front is rough voiced and close to its frequency response. |
Alternate tapping and carving until a balanced frequency scheme is achieved within an overall scale produces the hallmark of my instruments—balance and power with no hot or cold spots. This allows you, the performer, to play the piece, not the instrument. |
The top is voiced and 90% completed. |
The finished top, ready for assembly. |
The ribs have been slid up in the mold and linings are attached to the complex shape. |
Back at the mold, ribs have been milled to shape, bent on an index
to place their curves strategically in the mold, trimmed, blocks
inserted, and the linings glued in. The mold, again, has the complex
shape of the back carved into itself producing a focused parabola
where I would like to focus the reflected sound waves off the back,
linings are inserted only after the back-to-neck and heel blocks
joints are finalized. This I can do more easily when I can fit them
without having lining and brace ends getting in the way. Once fit,
the ribs are lined, back fit and glued down.
Linings clamped into place. |
Finished linings and side braces with slots to accept top or back braces. |
Ribs with mold glued onto finished top. |
Back glued on and out of the mold. |
Thinning the edges for flexibility prior to routing and binding.
|
The last phase of construction before the binding process is to thin the edges of the top to allow for greater flexibility and power. The top and back edges are then routed away, leaving ledges that a variety of purfling and binding materials can be glued into to achieve the look of the model or desire of the customer. Wood bindings and purflings, in my opinion, are the most stable and do not shrink in time, as plastic does, avoiding a chocked and compressed top or back. Many a fine instrument has become finer sounding when its plastic binding had finally cracked or come loose at the waist. Using wood bindings is, unfortunately, labor intensive compared to plastics.

A selection of center strip and butt plate purflings.
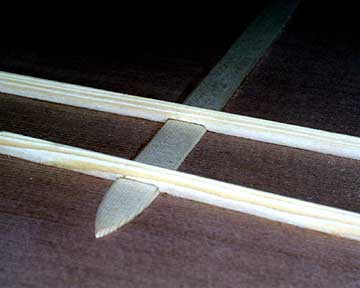
Tail inlay glued into butt joint. |
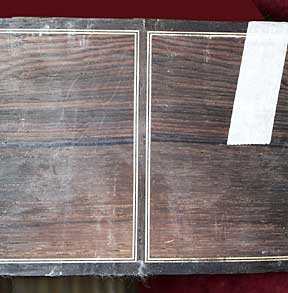
Back and ribs with intricate binding and purfling ledges routed to form mitred purfling joints. |
Three bindings and purflings installed, one to go. |
The last binding now in place, upholsterers cotton bias tape is used to tie on the bindings. |
Butt strip showing the four mitred corner joints. |
Body rough scraped and neck joint roughed. |
All necks are asymmetrical in their design, i.e., slightly thicker on the bass side, tapering to a more rounded treble edge for ease of the small barre and a uniform thickness along its length, extending well into the heel to facilitate play and barring through the twelfth fret. The neck is also shaped at the body joint to roll the hand into the position for play over the body. All models through the Model 1 are available with an optional truss rod or an epoxy graphite bar, allowing us to remove more bulk from the neck. Model 1a and above necks are double ebony laminated, set on the taper and incorporating 22 joints to produce the most aesthetic and durable neck being built in the world today. More information on our innovative neck design, as well as a discussion of fingerboard design as it affects tone and balance, may be found on the Classical Guitars page.
Head stock and neck material is cut from the same piece of mahogany. The neck stock is cut into three pieces, the center tapered, and ebony is laminated for beauty and strength. |
The head stock is now glued to the laminated neck. |
Necks taking form with peghead and heel block. |
The peghead is narrowed to accept ears to lock the joint and expand its width. |
Head stock veneers are now glued to peghead. |
Aluminum peghead template screwed on and the peghead routed to shape. |
Machine head holes being bored. |
Machines test fitted for depth before slots. |
String slots have now been routed. |
Heel waste is removed before fitting and carving neck to shape. |
When the neck is completed and carved to rough shape, the shoulders of the neck at the tenon are fit to the body. Angles are adjusted and straightness trued to the center line of the top and the neck is glued in place. Next, the fingerboard and heel cap are added. The final shaping of the fingerboard is accomplished by hand planing the top surface, either with a bass side tilt (for a classic) or a radius (for a steel string). Frets are driven home and the neck and body undergo their final graduations, scapings, and clean up.
Here the neck has fingerboard temporarily attached for fitting. |
This elevated neck system is now fit for gluing. |
The neck is finally attached. |
Boards on and neck heel is cut to the purfling line for continuation under the heel cap. |
Heel caps on. |
Frets hammered home. |
Note the mahogany edge under fingerboard tab on this elevated concert model. |
|
After a guitar is assembled, trimmed, and voiced, the finish process begins. It is nearly the last process, but by no means the least important.
Finishing an instrument involves many aspects, from preparing the woods for finish and filling the pores structure as necessary, to applying the top coat and rubbing and buffing the finish to a flat high gloss or mirror-like finish. Too much finish can kill the sound and too little finish will not sufficiently protect the instrument from daily wear. As you may well imagine it is a very fine line. We produce the thinnest possible finish in order to maximize the sound potential of the instrument.
We apply sprayed nitrocellulose lacquer and spirit varnishes, or the creme-de-la-creme of finishes, the hand-applied French polish, which we build in thousands of ultra thin layers. We can finish the instrument entirely with nitrocellulose lacquer or French polish, or we can finish in combination: the top only with French polish and the back, sides, and neck with lacquer or a spirit varnish.
Applying French polish to the top of this Bendaway Classic. |
Time to hang and cure. |
|
 |
|
|
For more detailed information on the classical models, go to the Classical Guitars page.
For more detailed information on the steel string models, go to
the Steel Strings
page.
WHO
WE ARE | INSTRUMENTS
WE BUILD | REPAIRS
& RESTORATIONS | INSTRUMENTS
FOR SALE | RENTALS
TOUR OUR STUDIO | WHAT'S
IN PROCESS | ENDORSERS
| CONTACT US | HOME
 My
goal in building guitars is to produce a much finer instrument
than can be found in the commercial marketplace, and this can only
be achieved with a very limited production level. Somehow, the shop
is a very busy place, since in addition to hand-building guitars,
we are one of the major fretted and orchestral restoration shops
in New England. My production level seldom exceeds 12 instruments,
with a projected maximum in the 12 to 24 instruments per year range.
These instruments are intended to be heirloom pieces, regardless
of price range.
My
goal in building guitars is to produce a much finer instrument
than can be found in the commercial marketplace, and this can only
be achieved with a very limited production level. Somehow, the shop
is a very busy place, since in addition to hand-building guitars,
we are one of the major fretted and orchestral restoration shops
in New England. My production level seldom exceeds 12 instruments,
with a projected maximum in the 12 to 24 instruments per year range.
These instruments are intended to be heirloom pieces, regardless
of price range. Wood
Wood