An Early 18th-Century
Violin
This instrument came to us with
a very interesting provenance, which we will post as the instrument
moves to the Restoration
pages. It is a very old violin, circa early 1700s. Check again for
further information. The instrument
was in a very sad state. The top and back plates, while having some
damage, were in quite good condition overall. The ribs, however,
were nearly destroyed and the depth of the instrument was very eratic.
The neck had previously been grafted and a very poor cheek graft
had been accomplished on the treble side. The back had damage in
the lower bout edges at the block area, and the button had been
broken off. The top required new edges throughout, a reforming of
the center of the top, and a soundpost patch. New blocks on both
ends, rib grafts, neck set, and color work were done to restore
the instrument. I hope you enjoy these photographs of one of the
most complete restorations we’ve done to date.
Note: Click on an image to see
it larger, then use your browser’s BACK button to
return to this page.
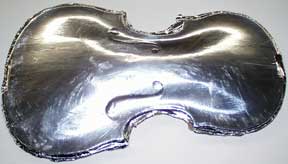
The first step after removing the top
is to place a layer of burnished aluminum foil and oil to
the top to make a casting that will support all future work.
|

Cross-section view of the violin top (seen
as the dark line in the middle) which has been lightly glued
to a flat board (bottom) that has a layer of brown paper
to allow ease of removal and a casting using using bondo
and a second layer of plywood (top).
|

Rough edge casting of the top
using plywood and bondo.
|

Finished casting of the back.
|

Lower bout back with grafted wood
to repair damage.
|

This shows the grafting after block
and ribs have been attached.
|

A button graft put into the back to replace the missing
back button (interior view).
|

Exterior view of button graft shown to the purfling
line.
|

Button graft, new block, and assembled ribs awaiting
top assembly.
|

Finished button graft with new purflings and shaped
into the reset neck.
|

The original ribs were so damaged that
much wood was missing and the height varied by as much as
5 mm.
|

Exterior view of the rib shown at left
clearly shows the original wood (dark) and the new wood
of the interior graft (light).
|

The original ribs were put in molds and
thinned to a feather edge on the interior damaged surface.
|

New wood was then glued to the original
rib and then thinned to a feather edge on the interior,
leaving a rib of uniform thickness.
|

A finished rib ready for linings.
|

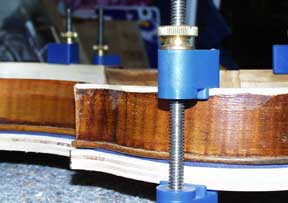
The back is held in its casting while the ribs with
new linings are fit to the blocks.
|

Here, the neck block and ribs have been
assembled onto the new button graft.
|
Upper bout ribs with feathered edge at top.
|

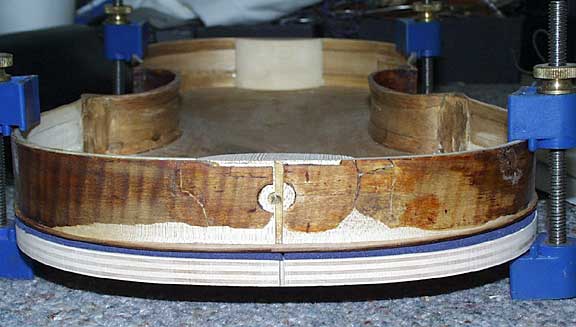
Ribs are now assembled to the back and block. Note
that all the white parts that you see are new wood grafted
to the ribs.
|

Interior view of neck area artificially aged in tint
only with potassium permanganate.
|

Here, the new wood has not been “aged”
and, as you can see, looks quite out of place.
|

Exterior view of the lower bout ribs.
|

The final patch has been added to the ribs
and the top has been attached.
|

Neck reset and wood ready for color.
|

The top has now been reglued and the neck set. A yellow
wash has been added to the white wood.
|

The top had a nasty dark overcoating in the center
of the instrument, put on in the past, apparently in an
attempt to hide something.
|

Back, before restoration coloring.
|

The scroll required bushing of old holes
and a cheek graft replacement.
|

Cheek graft finished and antiqued with first peg hole
drilled. Note bushings are uncolored.
|
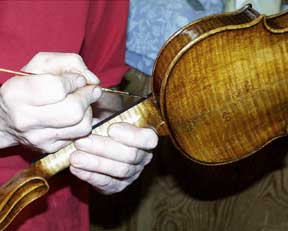
Here, the “cosmetic” magic begins. Colored
varnishes are laid on in multiple coats to achieve blending
of old and new.
|

Halfway through the process, artificial
flames and an overly dark coloring which is then scraped
to produce the illusion of natural flaming.
|

Well-disguised grafting on the finished rib.
|

Another view of the blending of old and new.
|
Go
back to Repairs and Restorations page
| | | |
| |
| |
|