|
What’s in Process |
Violin Family Setup
|
||||||
|
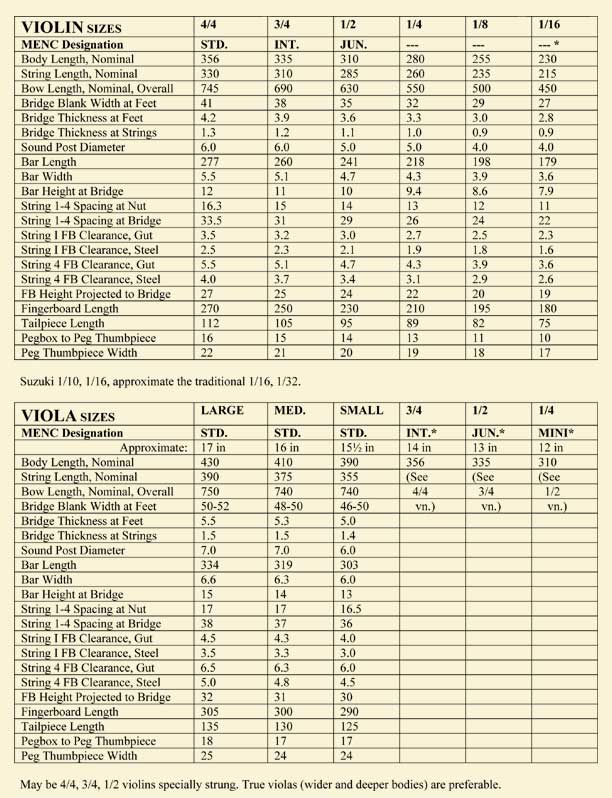
Over the years it has been our pleasure to have worked on many world-class instruments and to have heard them in the intimate concert hall venues of the Bay Chamber Concerts. Not only have we have developed a reputation for fine work, we have developed the ears to judge the quality of the sound and the dynamic of its projection, especially when heard in concert. In discussing the setup of an instrument, let me start with the playability aspect. Here we are talking measurements and angles such as those shown in the diagrams below. The measurements shown are considered correct for all professional level instruments. We believe all instruments, including beginner instruments, should have correct measurements.
The other most important factor not illustrated by these drawings is the string swinging off its resting position or equilibrium. When a string is bowed, it swings in an arch from the center point of its length. The softer and more flexible the string, the more the string travels from its center point. The bass strings swing more, while the stiffer treble strings move in a smaller arch. This arch necessitates a curve, called relief, be planed into the fingerboard. Hence, a fingerboard not only has the crosswise arching to accommodate correct bowing but must also have the lengthwise relief of .9 mm on the bass side and .5 mm on the treble side for the violin’s 330 mm scale length. For the cello’s 695 mm scale length, the relief is 1.2 mm on bass C-facet and .9 mm under the A string. This relief allows the strings to arch and not hit the fingerboard as you play—especially important during forte passages.
The fingerboard on a violin needs to be tilted to the treble side to allow the player easy access to the bass strings without excessive shoulder height when bowing. The cello needs the opposite—to be set with the bass side lower to give the player access to the bowing range. On both instruments, this is accomplished by a correct neck angle and a tilt to either bass or treble side at the apui, or overstand, before the fingerboard is glued to the neck. The arching on the fingerboard across its width must match the arching on the top surface of the bridge.
The BridgeThe bridge comes to us as a blank, roughly cut to size but thick and tall, with feet thick enough to be fit to an instrument top. The sawing of this blank from the maple tree is with the back surface 90° to the growth rings of the tree. This means when the bridge is fit to the top, the back surface is 90° to the top of the instrument and the grain lines are stacked up in exact parallel to the top. This keeps the bridge from bending under the load of string pressure. Once the feet are fit and the bridge top cut to height and arch, the body of the bridge towards the fingerboard is shaped to an arch and thickness called a clamshell (because it resembles the convex shape of a clamshell). The legs are thinned, and the heart and kidneys are carved to produce flexibility and allow or limit frequency ranges into the top. Not only are the cuts in the bridge decorative, they serve an exact function in producing a quality sound. Sound Post and Bass BarThe proper fit and placement of the sound post and the type of wood used for it are critical as well. We almost never see a sound post that correctly fits in its instrument. The tight evenly grained split from the block stock of European spruce is best for this essential part of the instrument. Not only must the post ends precisely fit the interior curves of the instrument's top and back, but it must have the length cut exactly to position the post in and out of the treble side bridge foot.
The bass foot of a bridge should sit on the bass bar that is glued to the interior of the instrument's top. This bass bar, when properly fit, is set in an exact location with an exact length and then tuned to a particular frequency range by carving it to a shape that both supports the top and allows the bridge foot to move and flex the bar to produce the bass range. By moving the sound post closer or further away from the treble side bridge foot, more or less energy is driven into the bass bar to adjust the balance of treble and bass. Moving the post in or out, towards bass or treble of the foot location, controls tonal quality. So the exact length of the sound post and its location can control balance and quality of sound produced by the instrument. As you can see, this is a very complicated set of relationships, and no matter what level of player you are, the instrument you play should all have these factors in correct relation to each other. Difficult as it is to learn correct intonation and position changes, you should have to learn them only once and not have to relearn due to having played an instrument with incorrect measurements. No matter the size of instrument you play, the standards have been set and worked upon for centuries. Today, those measurements have been standardized and put to type by the Music Educators’ National Conference (MENC) and by professional luthiers since the days of Sacconi, who set the arches and measurements for the modern violin strung to A-440 frequency. Below are charts of measurements for various sizes to help you understand your or your child’s instrument.
Download pdf versions of charts Violin/Viola or Cello/Bass
WHO
WE ARE | INSTRUMENTS
WE BUILD | REPAIRS
& RESTORATIONS | INSTRUMENTS
FOR SALE | RENTALS
|
 The
violin family instruments,
The
violin family instruments, 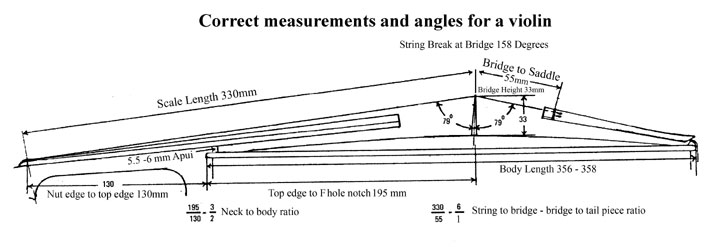
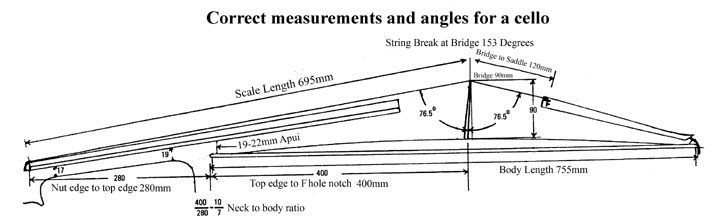
 Bridge
height is another important aspect of correct setup. The bridge
height of 33 mm for violin and 90 mm for cello puts the necessary
downward pressure on the architecture of the top to allow both
up and down flexing of the top to produce all the pitches and
harmonics of the string. Too tall a bridge loads the top and it
cannot speak and requires too much effort to produce the sound.
Too little pressure, and the top is wild and flighty, difficult
to control. In addition, the arching
of the bridge top allows the player to easily bow each string
individually and to play double and triple stops with ease without
hitting the C-bouts. This said about the height of the bridge
and arching of the bridge top means the action must be set with
the fingerboard.
Bridge
height is another important aspect of correct setup. The bridge
height of 33 mm for violin and 90 mm for cello puts the necessary
downward pressure on the architecture of the top to allow both
up and down flexing of the top to produce all the pitches and
harmonics of the string. Too tall a bridge loads the top and it
cannot speak and requires too much effort to produce the sound.
Too little pressure, and the top is wild and flighty, difficult
to control. In addition, the arching
of the bridge top allows the player to easily bow each string
individually and to play double and triple stops with ease without
hitting the C-bouts. This said about the height of the bridge
and arching of the bridge top means the action must be set with
the fingerboard.